Installing and configuring Email Quarantine Connect
Configure certificates and authentication
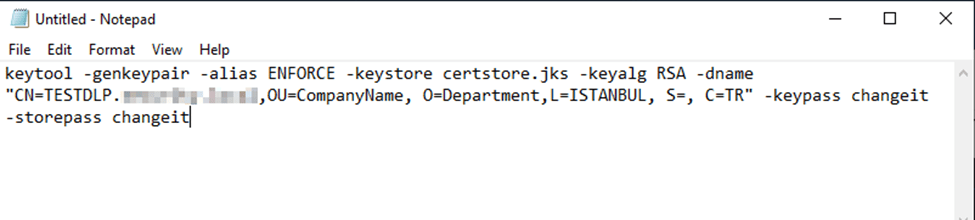
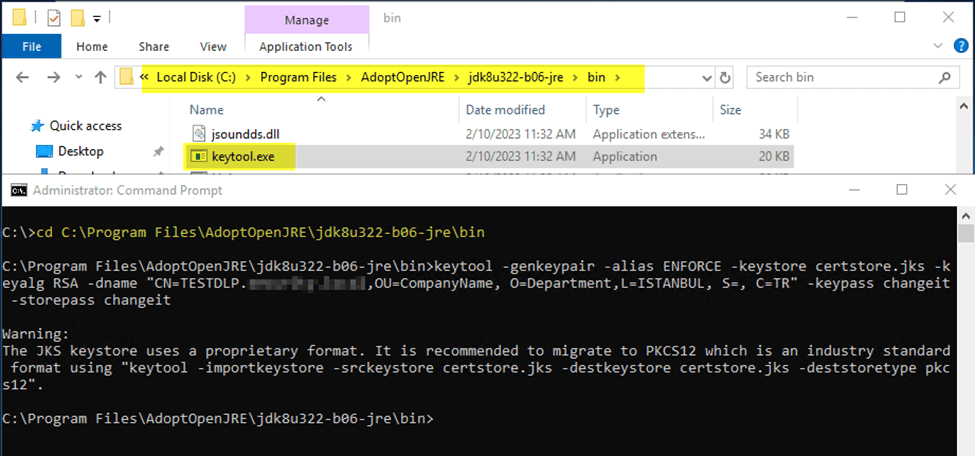
1-Create an Enforce Server keystore and client certificate by running the following command:
Linux:
/opt/Symantec/DataLossPrevention/EnforceServer/15.8.00000/Protect/jre/bin/ keytool -genkeypair -alias client -keystore certstore.jks -keyalg RSA -dname “CN=enforce_host, OU=organizational unit, O=organization, L=location, S=, C=country” -keypass password -storepass password
Windows:
\Program Files\Symantec\DataLossPrevention\EnforceServer\15.8.00000\ Protect\jre\bin\keytool -genkeypair -alias client -keystore certstore.jks -keyalg RSA -dname “CN=enforce_host, OU=organizational unit, O=organization, L=location, S=, C=country” -keypass password -storepass password
Where:
• enforce_host is the host name of the Enforce Server. For example, enforce.mycompany.com.
• organizational unit is the name of the organization unit. (Optional)
• organization is the name of the organization. (Optional)
• location is the location of the organization. (Optional)
• state is the name of the state where the organization is located. (Optional)
• country is the name of the country where the organization is located. (Optional) • password is a password you create to control access to the keystore. Use the same password for both the – keypass and -storepass arguments. Do not lose this password. You use this password in a later step to configure an Enforce Server credential.
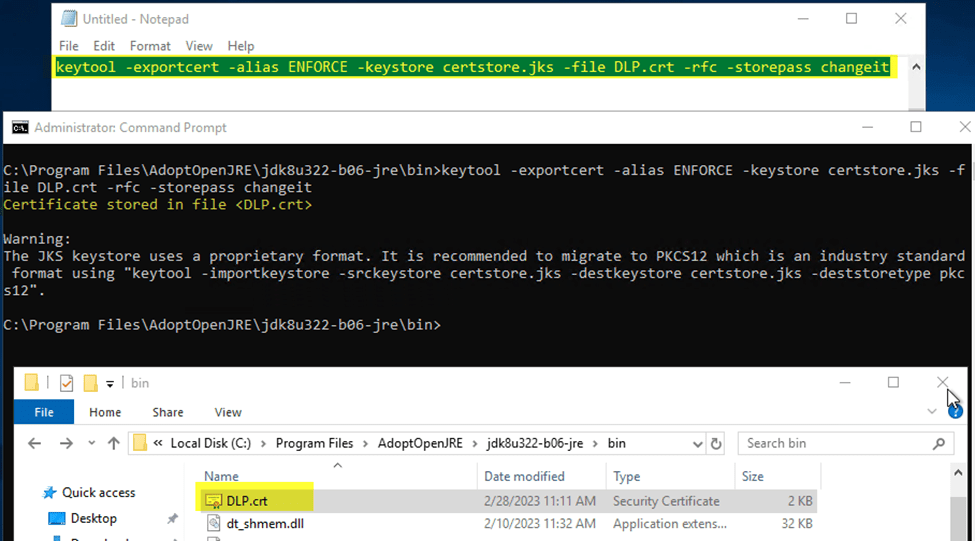
2- Export the client certificate you created in the previous step by running the following command:
Linux:
/opt/Symantec/DataLossPrevention/EnforceServer/15.8.00000/Protect/jre/bin/keytool -exportcert -alias client -keystore certstore.jks -file client.crt -rfc -storepass password
Windows:
\Program Files\Symantec\DataLossPrevention\EnforceServer\15.8.00000\Protect\ jre\bin\keytool -exportcert -alias client -keystore certstore.jks -file client.crt -rfc -storepass password
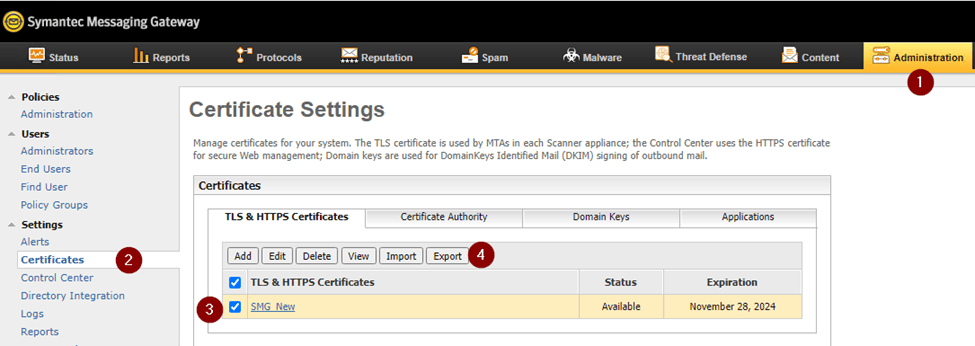
3- In the Symantec Messaging Gateway Control Center import the Enforce Server client certificate you created in step 1
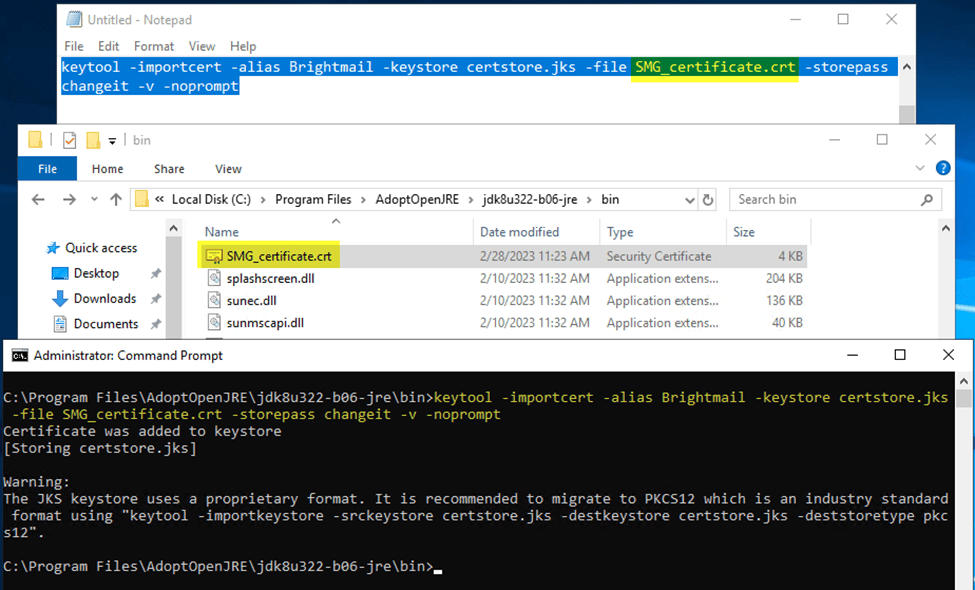
4- On the Enforce Server host, import the server certificate that was created on the Symantec Messaging Gateway Control Center into the client keystore by running the following command:
Linux:
/opt/Symantec/DataLossPrevention/EnforceServer/15.8.00000/Protect/ keystore/jre/bin/keytool -importcert -alias server -keystore certstore.jks -file server.crt -storepass -v -noprompt
Windows: \Program Files\Symantec\DataLossPrevention\EnforceServer\15.8.00000\Protect\ keystore\jre\bin\keytool -importcert -alias server -keystore certstore.jks -file server.crt -storepass -v -noprompt
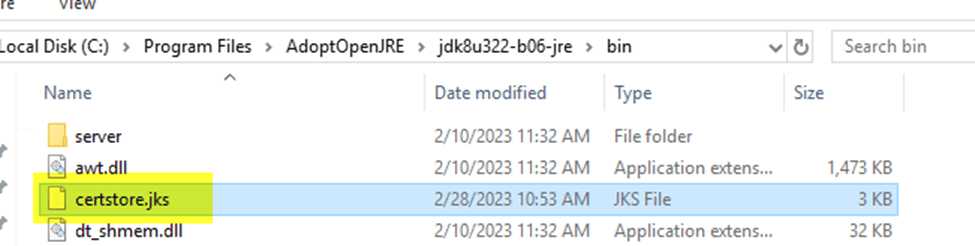
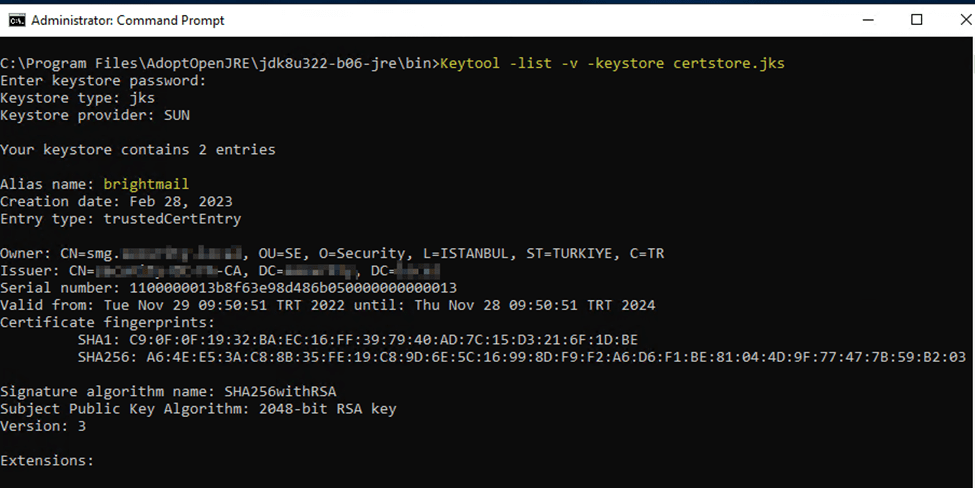
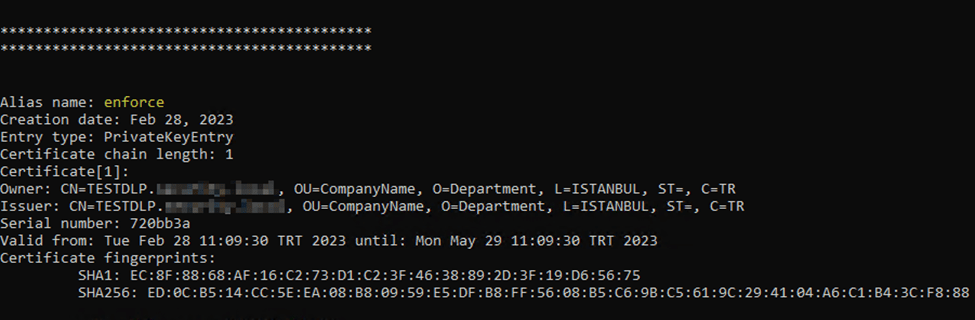
5- You can see the contents of the certstore.jks certificate vault with the following command:
Keytool -list -v -keystore certstore.jks
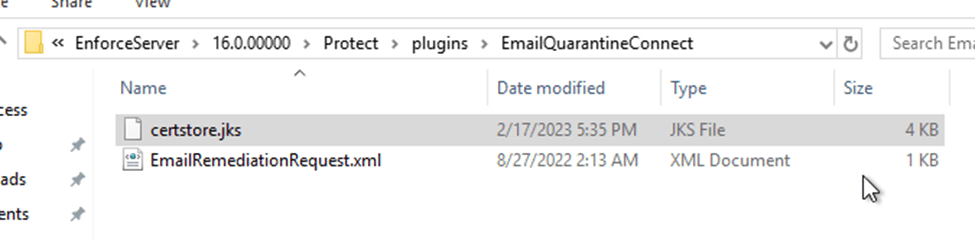
6- Copy the certificate store file (certstore.jks) to the following directory:
(Linux)
/opt/Symantec/DataLossPrevention/EnforceServer/15.8.0000/Protect/plugins/ EmailQuarantineConnect
(Windows) \Program Files\Symantec\DataLossPrevention\EnforceServer 15.8.00000\ Protect \plugins\EmailQuarantineConnect
7- Open the Enforce Server administration console and log on as a user with Administration privileges.
8- Navigate to System > Credentials.
9- Click Add Credential.
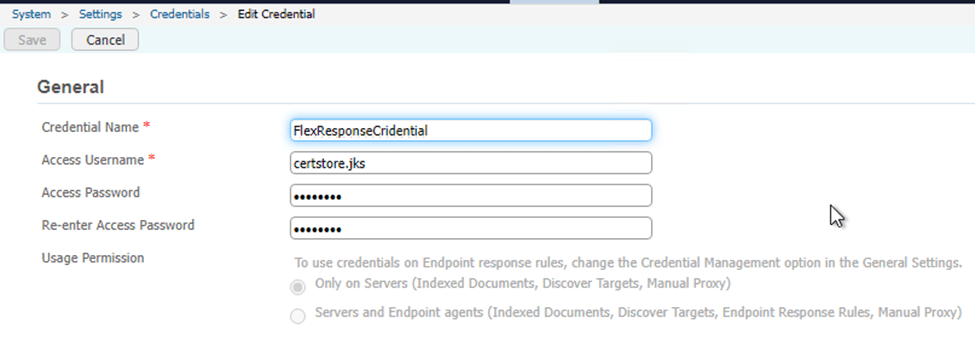
10- Type a Credential Name. You type this credential name in the configuration files for the three FlexResponse plug-ins in a later step.
11- In the Access Username field, type the name of the keystore file. For example: certstore.jks
12- In the Access Password field, type the password for the keystore file.
Creating a user and role for use by Symantec Messaging Gateway with Email Quarantine Connect
- Log on to the Enforce Server administration console as an administrator.
- Select System > Login Management > Roles
- Click Add Role
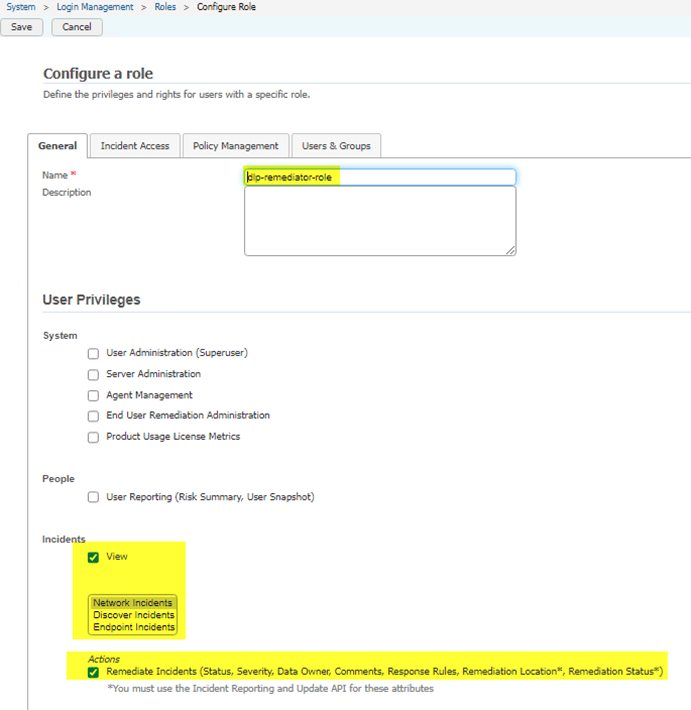
- Type a name for the new role in the Name field. For example, type dlp-remediator-role.
- In the User Privileges section of the screen, select the following items:


6- Click Save.
7- Select System > Login Management > DLP Users.
8- Click Add DLP User.
9- Type values for the Name, New Password, and Re-enter New Password fields.
10- In the Roles section of the screen, select the new role you created in step 4. For example, select dlp-remediatorrole.
11- Select the same role in the Default Role menu.
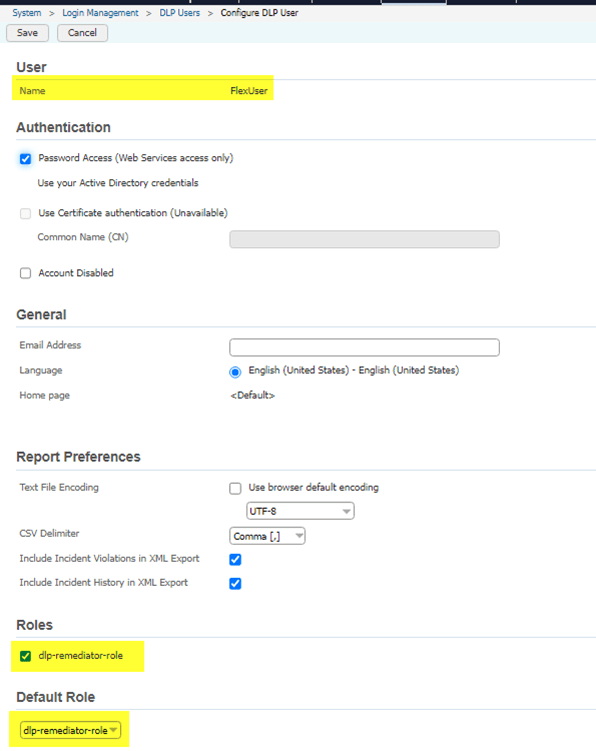
NOTE: If you configure Active Directory authentication before, you should create the this account on AD with the same name that you create the account on DLP. You will be create the password of this user on Active Directory.
12- Click Save.
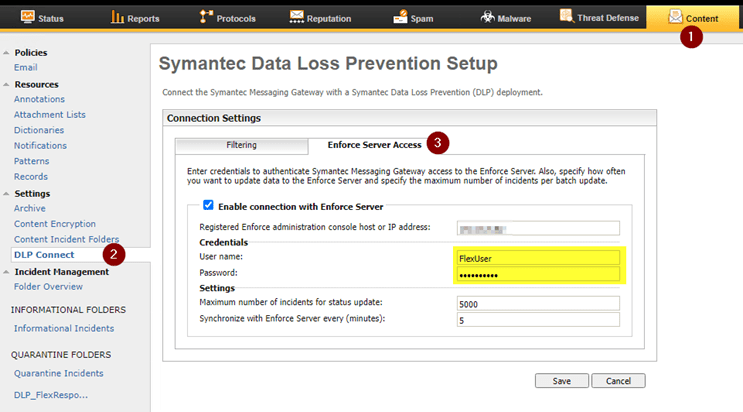
13- In the Symantec Messaging Gateway Control Center, specify the Enforce Server user and password.
Installing the Email Quarantine Connect FlexResponse plug-in
1- Obtain the Email Quarantine Connect installer from the Symantec Support website.
2- Copy the Symantec_DLP_Plugin_Email_Quarantine_Connect.exe file to a temporary directory on a Windows computer. (If you are running the Enforce Server on a Windows computer, you can copy the file to a temporary directory on the Enforce Server host.)
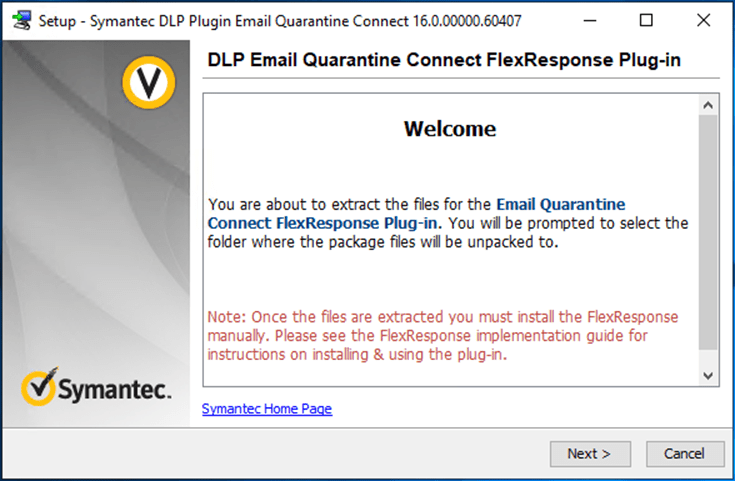
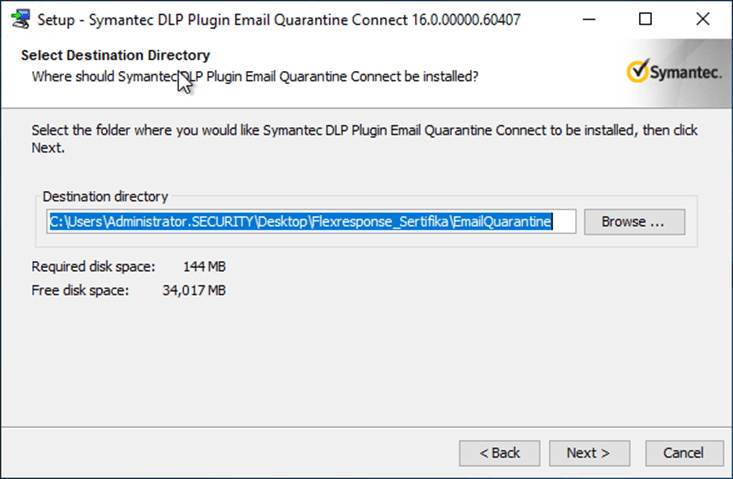
3- Double-click the installer file. When the installer prompts you, type the name of a temporary destination folder.

4- Choose the temporary folder and click Next.
The installer extracts the plug-in files to the temporary folder
5- Navigate to the temporary folder containing the extracted files.
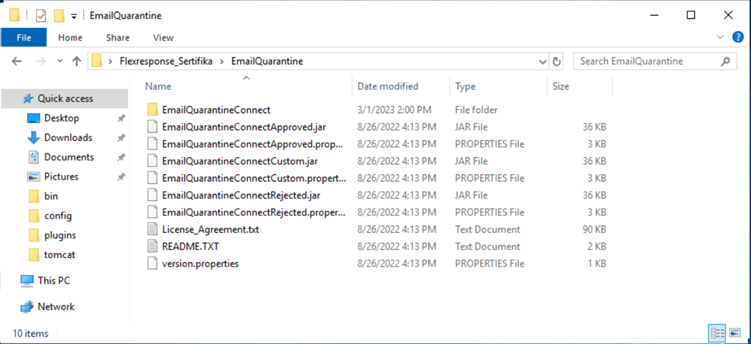
6- Copy the following items to the “\ProgramFiles\Symantec\DataLossPrevention\EnforceServer \version\Protect\plugins\” folder on the Enforce Server host:
• EmailQuarantineConnectApproved.jar
• EmailQuarantineConnectApproved.properties
• EmailQuarantineConnectCustom.jar
• EmailQuarantineConnectCustom.properties
• EmailQuarantineConnectRejected.jar
• EmailQuarantineConnectRejected.properties
• EmailQuarantineConnect.
7- Open the following file in a text editor:
\Program Files\Symantec\DataLossPrevention\EnforceServer\ version\Protect\config \Plugins.properties

8- Locate the following property in the Plugin.properties file:
com.symantec.dlpx.flexresponse.Plugin.plugins
If the property begins with a comment character (#), remove it.
This line lists all of the deployed plug-ins. Add the following entries, each separated by commas:
• EmailQuarantineConnectApproved.jar
• EmailQuarantineConnectCustom.jar
• EmailQuarantineConnectRejected.jar
For example:
com.symantec.dlpx.flexresponse.Plugin.plugins = EmailQuarantineConnectApprove.jar, EmailQuarantineConnect-Custom.jar, EmailQuarantineConnect-Reject.jar

9- Save the Plugin.properties file.
Configuring the Email Quarantine Connect FlexResponse plug-in
1- Open each of the following plug-in properties files in a text editor:
• EmailQuarantineConnectApproved.properties
• EmailQuarantineConnectCustom.properties
• EmailQuarantineConnectRejected.properties
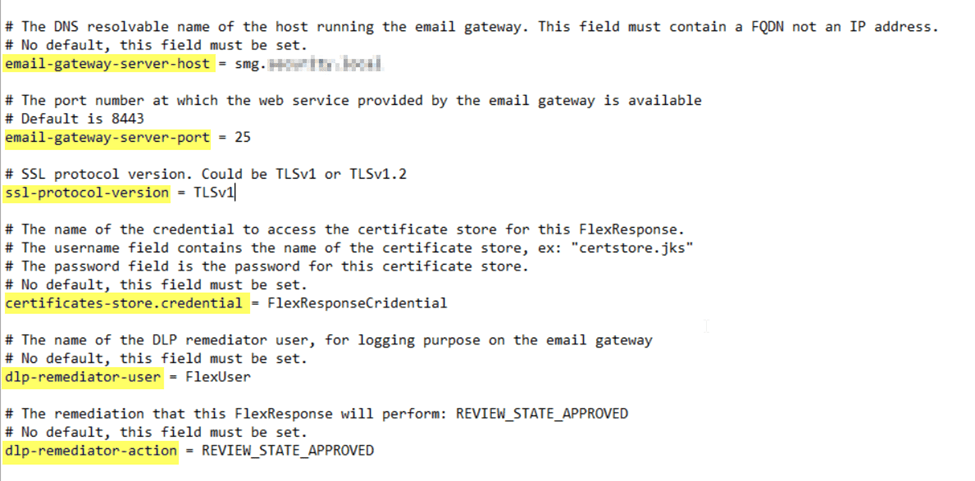
2- In each file, change the following properties as indicated:
| email-gateway-server-host | Type the host name of the Symantec Messaging Gateway host.This property should contain a fully-qualified domain name that is resolvable by DNS or an IP address. Type the host name of the Symantec Messaging Gateway host. This property should contain a fully-qualified domain name that isresolvable by DNS or an IP address. |
| email-gateway-server-port | Type the port number of the Symantec Messaging Gateway host. The default value is 8443. |
| certificates-store.credential | Type the name of the stored credential that you created in a previous step |
| dlp-remediator-user | Type the username of the Symantec Data Loss Preventionremediator.This user is used to identify log and history entries that are stored in the Symantec Messaging Gateway environment. The user does not have to be a user that defined in either Symantec Data Loss Prevention or Symantec Messaging Gateway |
| dlp-remediator-action | This property has already been configured. |
Do not change any other properties in the files.
3- Save the properties files.
4- Restart the SymantecDLPManagerService and Incident Persister services.

Creating response rules for Email Quarantine Connect
1- Open the Enforce Server administration console
2- Navigate to Manage > Response Rules.
3- Click Add Response Rule.
4- Select Smart Response and click Next.
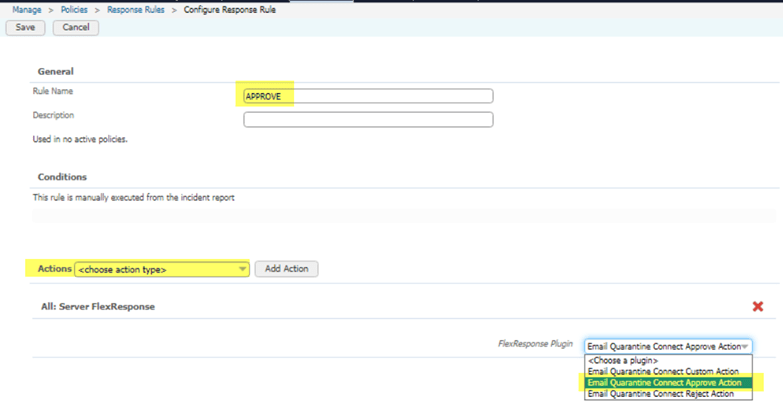
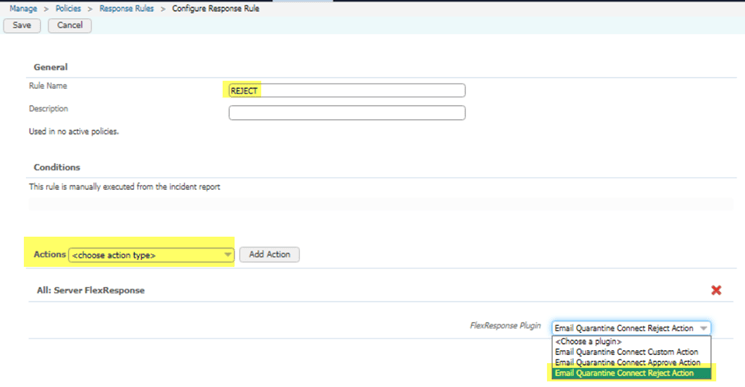
5- Type a Rule Name for the response rule.
This rule name displays in the incident snapshot and incident lists as the name of the smart response action. You may want to name the response rule with descriptive names, such as Approve, Reject, or another name that represents the functionality that is configured in the Symantec Messaging Gateway environment.
6- (Optional) Type a description of the response rule.
7- In the Actions drop-down list, select Server FlexResponse and click Add Action
The All Server FlexResponse action displays
8- In the FlexResponse Plug-in drop-down list, define the appropriate action for the rule by selecting one of the following three actions:
• SMG Custom Action
• SMG Approve Action
• SMG Reject Action
9- Click Save.
10- Repeat steps Click Add Response Rule – Click Save for each of the remaining actions.
Example:


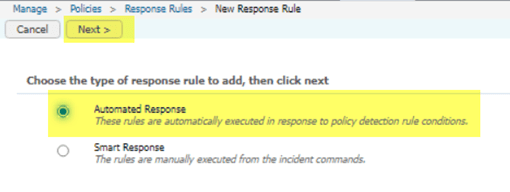
11- Click Add Response Rule.
12- Select Automated Response and click Next.
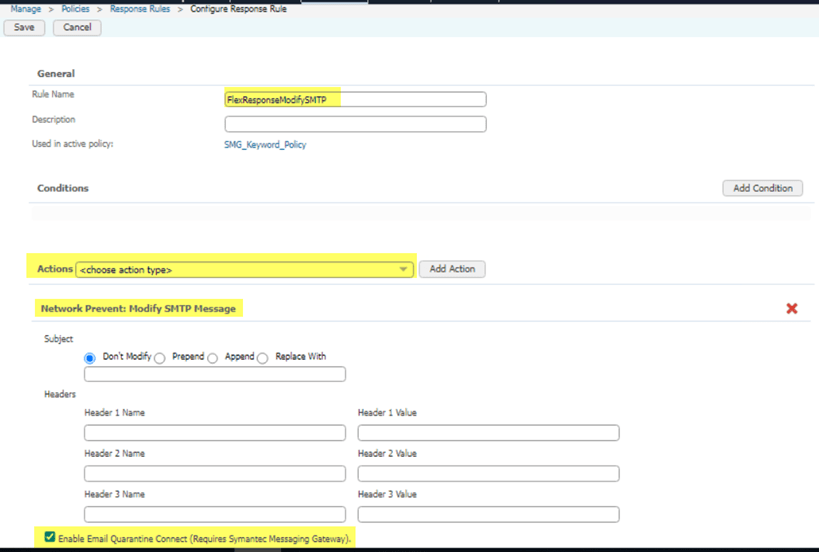
13- Type a name for the response rule in the Rule Name field.
14- In the Actions drop-down list, select Network Prevent > Modify SMTP Message and click Add Action
15- In the Network Prevent: Modify SMTP Message action box, select Enable Email Quarantine Connect. Do not select or enter anything else in the Network Prevent: Modify SMTP Message area.
16- Click Save.
Configuring Symantec Messaging Gateway routing, policies, and filters
1- Route outbound email to Data Loss Prevention Network Prevent and configure Symantec Data Loss Prevention Network Prevent for Email to route email back to Symantec Messaging Gateway. If you have multiple outbound scanners, you can route outbound mail to Data Loss Prevention Network Prevent servers differently for each scanner. Alternatively, you can apply the same settings to all outbound scanners
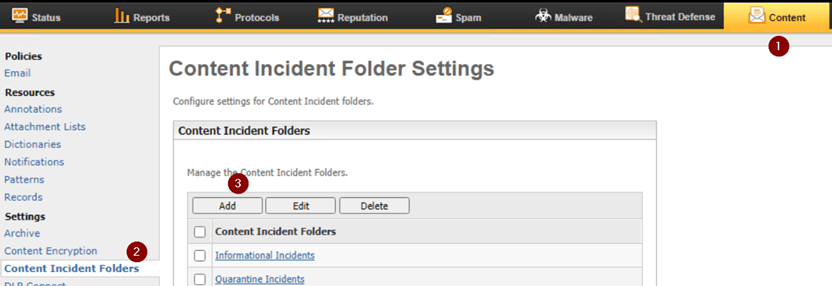
2- Create incident folders to capture the messages that violate content filtering policies and hold for remediation or review.
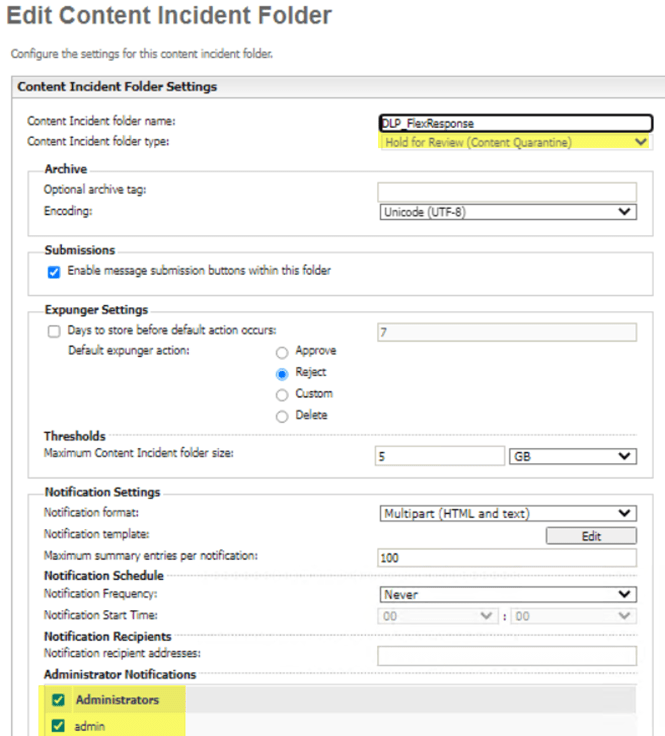
In the Symantec Messaging Gateway Control Center, select the folder type Hold for Review (Content Quarantine) to hold incidents for remediation or you can choose Informational Incidents to hold incidents for review.
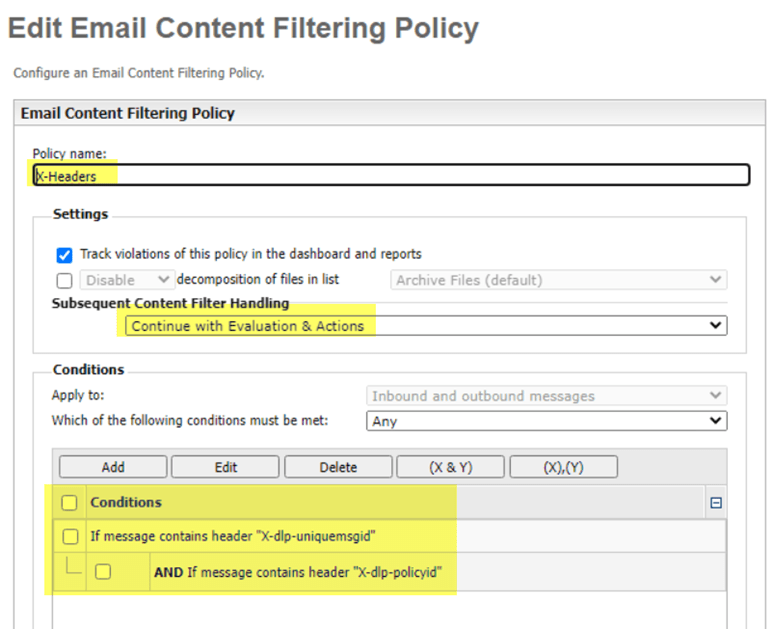
3- Create content filtering policies to detect the X-headers that the Symantec Data Loss Prevention automated response rule inserts into email messages. The X-headers should take the following form:
X-dlp-uniquemsgid: <message ID>
X-dlp-policyid: <policy ID>
For example:
X-dlp-uniquemsgid: 3984736A-2964-437D-A0EC-67E62D4C187F
X-dlp-policyid: 23
Symantec Messaging Gateway filters messages for these headers. Based on the policy actions that you specify; it creates incidents in quarantine incident folders or informational incident folders. Specify the policy action Create a quarantine incident to hold these incidents for remediation. Or you can specify the policy action to Create an informational incident to hold these incidents for review.
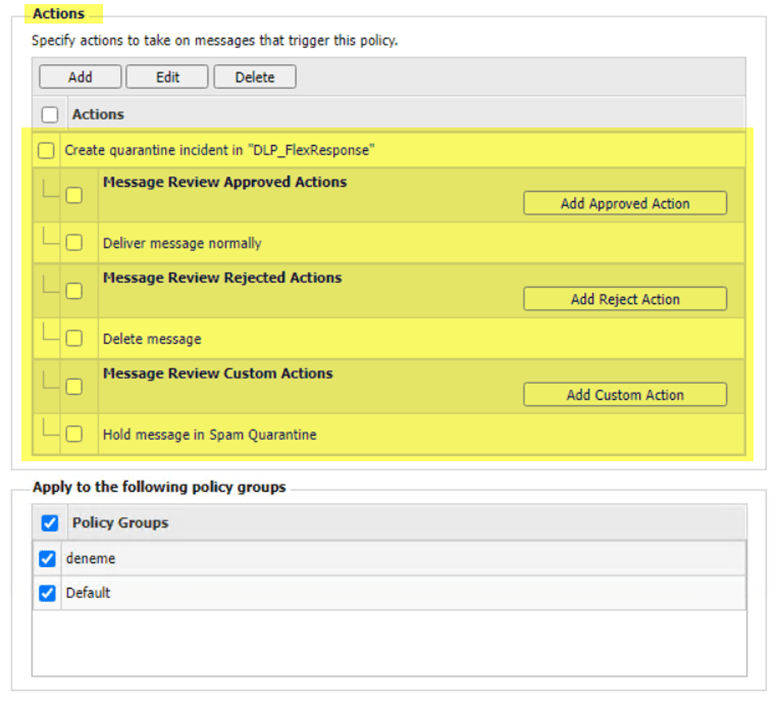
4- Add specific content filter policy actions for the Approve, Reject, and Custom actions, as described in FlexResponse actions. You can configure any available action. These actions map to the three FlexResponse remediation actions you configured previously in Configuring the Email Quarantine Connect FlexResponse plug-in.
| Symantec Messaging Gateway action | Symantec Data Loss Prevention FlexResponse dlp-remediator-action property | Description |
| Approve | REVIEW_STATE_APPROVED | This action signals that the quarantined email has been approved for delivery. For a typical quarantine workflow, set this action to: Deliver Message Normally |
| Reject | REVIEW_STATE_REJECTED | This action signals that the quarantined email has not been approved for delivery. For a typical quarantine workflow, set this action to: Delete message |
| Custom | REVIEW_STATE_CUSTOM | You can set this action to any user-defined action. For a typical quarantine workflow, configure this action to encrypt and then deliver the message. You can also configure this action to archive the message. |

Configuring Network Prevent for Email for use with Email Quarantine Connect
In the following procedure, you configure how a Network Prevent for Email detection server operates with Symantec Messaging Gateway. Select one of the following modes:
| Reflecting mode | In reflecting mode, the Network Prevent for Email detection serverreceives messages from a Mail Transfer Agent (MTA). It analyzes them, and then returns them to the same MTA (with instructions to block the messages or process them downstream). In essence,the server returns messages to the same IP address from which they arrived. |
| Forwarding mode | In forwarding mode, the Network Prevent for Email detection server receives messages from an upstream MTA. It analyzes them, and then sends them on to a downstream MTA or hosted email service provider. You can specify a list of IP addresses or host names for the next-hop mail server in the Network Prevent for Email server configuration. |
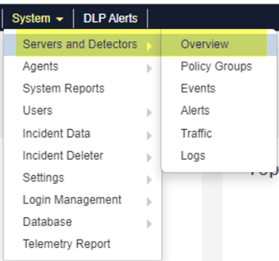
1- Open the Enforce Server administration console and navigate to System > Servers > Overview.
2- Click on a Network Prevent for Email detection server
3- Click Configure.
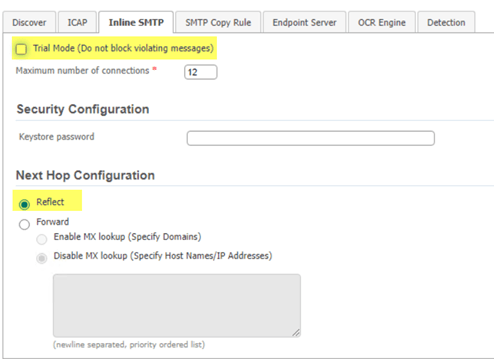
4- For production systems, deselect Trial Mode. For testing purposes, you may want to leave Trial Mode selected so that actual messages are not blocked
When trial mode is selected, the server detects incidents and creates incident reports, but does not block any messages.
5- To configure Reflecting mode, select Reflect in the Next Hop Configuration section and skip to Step Click Save.
To configure Forwarding mode, select Forward and Disable MX lookup in the Next Hop Configuration section.
6- In the Next Hop Configuration section of the page, type the host name of the Symantec Messaging Gateway server in the text box.
7- Click Save.
8- Click Server Settings.
9- Set the RequestProcessor.MTAResubmitPort property to the port number used by Symantec Messaging Gateway. The default value is 10026.
10- Click Save.
11- Click Done.
Example:

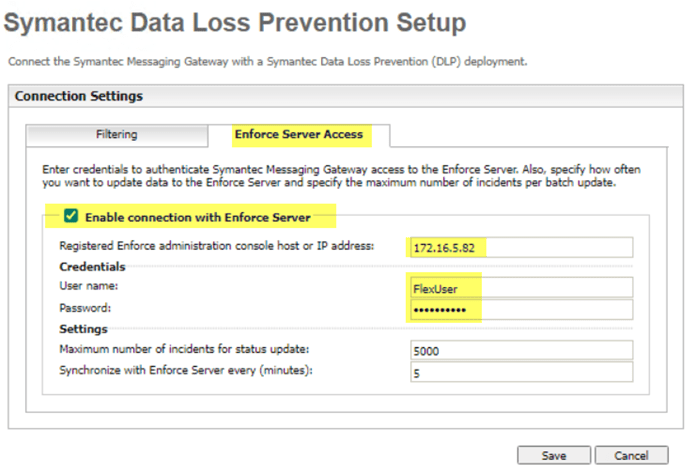
Configuration of Symantec Data Loss Prevention Connection on Symantec Messaging Gateway.
1- On “Route Outbound Mail to DLP Servers” and “Accept Scanned Mail from DLP Servers” tabs Detection server IP should be typed.
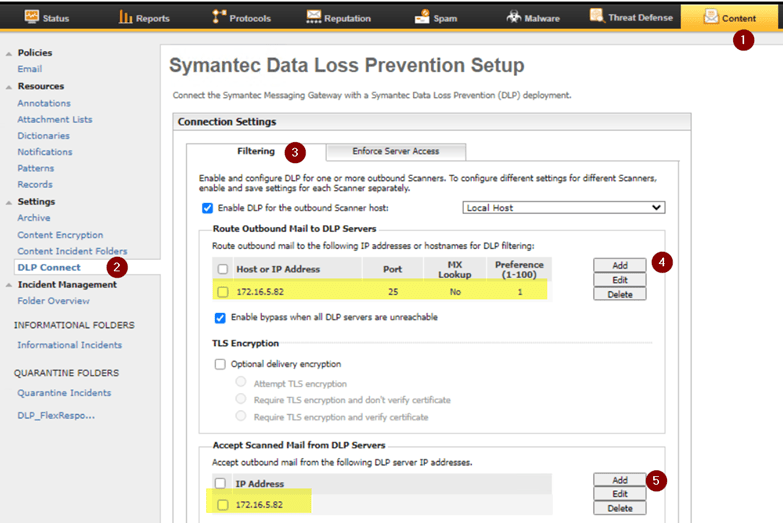
2- Enter the enforce server IP and user credentials.